Introduction to Cleaning Your Pump Parts
All breast pump parts should be clean and sterile prior to use and after pumping sessions, while the latter is particularly important for the first 6 months of baby’s life or if immune compromised (weakened immune system). The parts come in contact with skin, milk, air, saliva (if connecting to a bottle), and the environment around you, all of which can be vehicles for bacterial and microbe growth over time. Proper steps will also allow for full longevity of breastmilk inventory and storage prior to expiration, providing extra protection from contaminating factors.
There are different ways to do the same thing, but let’s discuss the necessary steps that need to be checked off when sterilizing your equipment.
These steps may be time consuming, especially since some recommend using the top rack of the dishwasher to both wash and sanitize, however, the goal is to not only clean thoroughly and sanitize, but protect the integrity of your breast pump parts. We want to avoid warping, cracking, and plastic breakdown.
Step One: Wash
The Centers for Disease Control and Prevention (CDC), as well as the U.S. Food and Drug Administration (FDA), both agree that breast pump kits should be physically washed, prior to sanitation. This is to remove debris, such as milk or water residues, dust, etc., and provide a clean canvas in which to be thoroughly sterilized at the microscopic level. Simply using hot water, dish soap, and a dish brush or sponge will do the trick.


Method: Hand Washing
You will need a sink or wash basin, a clean area on your countertop, a dish towel or paper towel, dish soap, and hot running water for cleaning breast pump parts. If washing bottles, bottle brushes come in handy.
1. Thoroughly wash your hands with warm soap and water.
2. Disassemble each breast pump part that came into contact with breast milk. This includes:
- Valves
- Baby Bottles
- Bottle Discs
- Breast Shield/ Flanges
- Breast Shield Connectors
- Bottle Nipples
- Bottle Covers
- The Twist's Silicone Gaskets
- Diaphragms
3. Rinse each part (do not rinse the tubing) with cool water to remove milk residue.
4. Here are a few options for washing pump parts:
- Separately wash each part in the sink with a soft brush and soap. (Be sure to use a new brush or washcloth exclusively for breast pump parts.)
- Soak each part in warm, soapy water for 5 minutes and then thoroughly rinse them.
5. Dry each part with a clean towel or allow to fully air dry on a sanitary surface, such as a clean paper towel or clean dish towel. Do not pat dry.
6. Wipe the outside of your breast pump with a dry, clean towel.
Keep in mind: It is not recommended to wash and dry Motif Breast Pump parts in the dishwasher. There is no standard temperature for dishwashers and some may warp parts. Parts damaged in the dishwasher are not covered under warranty. Always check manufacturer’s instructions prior to using the dishwasher, to check if your pump parts or bottles are dishwasher safe, even if using the top rack.
Step Two: Sterilize
While it’s not required for to always sterilize, you should sterilize prior to the first usage, if baby is 6 months old or younger, or if the baby is immune-compromised. It’s not possible to completely sterilize to medical standards, but we can get pretty close. This step is to get the pumping parts hot enough to kill and prevent bacterial growth.
Method: Stovetop Boiling
Items you will find useful for this step are:
- Clean Tongs or slotted spoon
- Mesh Laundry Bag (for holding smaller pieces, such as the valves and membranes)
- Dish towel / paper towel for drying
The 5 Steps for Easily Sanitizing Breast Pump Parts:
1. Follow steps above for cleaning breast pump parts.
2. Place your breast pump parts in a pot and cover them with water.
3. Bring water to a boil and let boil for five minutes.
4. Remove parts with clean tongs or slotted spoon from the boiling water.
5. Place pump parts on a clean paper towel or dishtowel and allow to air dry completely.
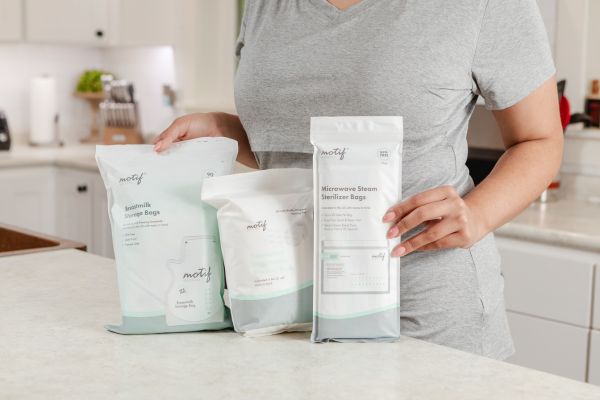
Method: Microwave Steam Bags
Safe, quick, and easy to use for on-the-go moms. Ideal for breast pump parts, bottles, nipples, pacifiers and cups. Microwave steaming destroys 99.99% of most harmful germs and bacteria found in breast pump parts and supplies. These can be used up to 20 times, which is incredibly convenient.
Steps:
- Ensure all breast pump parts and accessories are completely disassembled, washed and cleaned. *Note: Do not wash, clean, sanitize, or sterilize tubing. Make sure no moisture gets inside the tubing.
- Pour 2 oz. (60 ml) of cold water into the bag.
- Put microwave-safe breast pump parts and accessories into the bag. *Do not use if the microwave is too small for the bag to fully rotate.
- Place the bag standing upright in the center of the turntable in the microwave.
- Microwave on full power for: 1.5 minutes = 110W (and above) 3 minutes = 800W-1100W 5 minutes = 500W-750W
- Once the cycle is complete, let the bag cool for 5 minutes.
- Before opening the seal on the bag, carefully pour away any excess water through the side steam vent.
- Open the zip seal and remove contents for use.
- Let the bag dry before storing away for reuse.
- Do not use the bag more than 20 times.
WARNING: Hot steam may escape when the bag is opened. Do not wash, clean, sanitize, or sterilize tubing. Make sure no moisture gets inside the breast pump tubing.
How Often Should I Replace My Pump Parts?
Many people wonder, what is the key to keeping their breast pump working properly for longer? The good news is - there is no secret! Simply replace integral breast pump parts regularly. As you use your breast pump the hard-working components can become worn out, stretched, and frayed. After 90 days it's recommended to change out all the breast pump parts which come into contact with milk, as well as the tubing. Read more.
Information provided in blogs should not be used as a substitute for medical care or consultation.


